reminder

************************************************************************************************************************ Just a little reminder: I do use "retired" items in my projects so current customers can get inspired! You will notice that once you click on the listed items as they will not show up in my SU! store! ALL cards are now posted to Facebook only! So please be sure to click on the link below...

FB

Showing posts with label Silhouette Cameo. Show all posts

Monday, June 12, 2017

Electronic Paper crafting with Stampin' Up! Supplies

I needed a birthday card for a friend who is an avid fisherman and gasp I discovered I must have sold my retired stamp set with the fish and the boat etc...   BUT my electronic cutter (Cameo by Silhouette) came to the rescue!


The whole card was cut from Pear Pizzazz CS and then I sponged in Island Indigo around the fishes to create dark blue water...

Here is a look from the back.. un-inked


And here is the inside


BTW, the electronic cut file of the fish card was purchased online and I am not able to share...


Supplies used:


Wednesday, April 19, 2017

Pet Sympathy Card

Today's card is one of those that I don't like to make.. a sympathy card. And in this case it was for a pet sitting client that recently lost her little dog... so sad!


The heart shape with the paw cut out was created with my Silhouette Cameo... I sponged the shape and the doily in Elegant Eggplant

Supplies used:


Saturday, December 24, 2016

Fun Gift Card Holders by Silhouette Cameo

Today I can share the gift card holders that I created for Christmas this year. I know they do not use Stampin' Up Stamps and dies, BUT they are made from our high quality cardstock and pretty Designer Series Papers. And know some of you out there have electronic cutters too and enjoy seeing inspiration like that. Disclaimer: I did not design them, I purchased the cut file from the "sil store"...

Here are the pretties:


MERRY CHRISTMAS to you all!!!


Monday, November 28, 2016

Just a little bit of stamping...

What do you do when one of you friends turns 50 and loves to deer hunt? Well you make a card fitting for that...


I know the only thing stamped on this card is the sentiment... The rest, I've designed and created in my Silhouette Design Studio and cut out with the cameo (electronic cutter)

I just wanted to point out that our Stampin' Up! cardstock works so very well for other paper crafts too... AND I used our new framelits "Stitched Shapes"... so I combined the best of both worlds and had fun!

BTW - I've created this cutting file from scratch and it is not for sale...

Supplies used:


Thursday, October 6, 2016

Let's talk Paper Quality

So today I am going to share a card with you that you may think has NOTHING to do with Stampin' Up! Well, you are wrong. LOL

Yes, I did not stamp anything on this card .... BUT I used Stampin' Up! cardstock to cut the Viking shape with my silhouette cameo (which I copied and traced myself and is not for re-sale)... And of course used our cardstock for layering as well.  But the main reason why I am talking about cardstock today, is to point out for those of you that may not know yet.. we now have white cardstock in the same thick high quality as our colored cardstock. And that my friend is priceless. If you ever made full cards from white cardstock using our old whisper white cs then you know what I am talking about. It felt flimsy because it is thinner. Well it is wonderful for stamping on but for the card base, you really want to use our thick white cardstock! You just don't know how happy this cardstock option makes me!

The card I made is large! It's a full sheet of cs folded in half so it's measuring 8 1/2 by 5 1/2 and feels just great...

Here it is:


The greeting is printed using the "viking" font that I downloaded for free from dafont.com... I actually used the print and cut feature for it ;-)

Here is a closer look of the cut shape


I hope you'll consider using the thick white cardstock for your cardbased in the future... you will love it!

Supplies used:


Saturday, September 10, 2016

No stamping for me today

I had some of my friends over today at the pool and I made some little gifties for them.  Well I wanted it all look nice so I decorated a little bit.... I cut some flowers from cardstock and clipped on fabric tote bags


And to go along with the same "theme" I used some more of the flowers to greet them with a mini cup cake...


It fit perfectly...


Oh and the gift inside the bag was a towel...that I customized


So you see... I don't always stamp ;-) I can craft without using ink... I love my Silhouette Cameo...Just wanted you to see what I was up to... Have a great Sunday!


Friday, September 9, 2016

Golf Birthday

Soooo I needed a Birthday card for someone that loves to play golf and Rob very quickly told me in advance that it will have to be a card fitting the theme. Hmmmmm..... so of course I had to comply with the demand ;-) and put my thinking hat on...

Here is my golf card:


And it is a spinner card! See what it does:


Basically you create a slit in your card layer so the item can use it to roll back and forth on. Two Pennies are attached to one another with a dimensional. That stack will sit inside the track. One penny on the backside of the top layer cardstock, then the dimensional and the other penny on the front. Then another dimensional can be used to attach item that should "spinn".

I took some pictures to give you a visual in case my verbal instructions came across as jibberish


Supplies used:
BTW the shape of the golf club was cut electronically and the file was purchased from the Silhouette store


Tuesday, December 15, 2015

Short box and no stamping

Today I am sharing a quick short Christmas box with you that I made to put a little ring dish into. And I was so thrilled that it worked perfectly!

Here is the end result:


I made to box with the gift box punch board using the 12x12 Kraft sheets. It used a sheet 9x9 and I had extra to make the band that goes around for the closure.. Once assembled, I simple decorated the sides with Designer Series paper. So easy!

The Poinsettia was punched with the Festive Flower Punch from red glimmer paper. And I put it together using hot glue and my silicone mat..

Here is a little collage for you:


Supplies used:


Built for Free Using: My Stampin Blog


Tuesday, October 6, 2015

Kitty Angel

The same week that I had to make the dog sympathy card, I needed one for a friend that lost her sweet cat. I didn't want to share the card so shortly after and then I just didn't find the right moment.  Well it NEVER is, so I am posting the card today...


I took the cat digital image from My Digital Studio and cut it with the Silhouette Cameo. The wings I had traced from and image found online and cut as well... 

The background was created with the Hearts and Stars Mask and Blushing Bride ink and a sponge, very easy!

Supplies used:

Built for Free Using: My Stampin Blog


Wednesday, September 30, 2015

Ombre Background

The other day I needed a card and I wanted it to have a bird as the focal point... so I went and created that part with my silhouette cameo...


So you might wonder why I am sharing this card with you on my Stampin' Up! blog? Weeellllll... it not only uses all SU papers and ONE stamp but also inks... LOL

I used my brayer and and brayered in from one side towards the middle the color Pool Party and then cleaned my brayer and did the same in Pear Pizzazz so I would have a very soft look and very little color overlapping.  The greeting I stamped in black StazOn so it would not smear... I sponged the edges in Early Espresso...

So with this little card, I really wanted to show you that you can combine your hobbies. And I would actually suggest you use Stampin' Up! cardstock when using an electronic cutter because it is such a good quality paper!

Supplies used:

Built for Free Using: My Stampin Blog


Saturday, September 26, 2015

Doggie Angel

A little while back a friend of mine had say good bye to her dog and I wanted to make a special card for her. It took me a little bit to do that, because whenever I started I'd get sad and put the materials aside.


In case you are wondering, no the embossing folder is not from Stampin' Up! It's a contraband... but so needed... The dog is an electronic stamp from My Digital Studio which I traced and cut with my Silhouette Cameo. The wings I found an image online and traced and cut as well...


On the inside of the card, I've added a poem that I found online and thought would be appropriate... and I signed it with her dogs name...


Do Not Mourn My Passing

Do not mourn my passing for if you could only see
by slipping all my earthly bonds, I'm young again and free.
By day I run the Heavenly fields, my body healthy and strong

At night I sleep at Angels' Feet, lulled by Celestial Song.
So do not mourn my passing, just close your eyes - you'll see
I'm once again that frisky pup, just as you remember me.

-Author Unknown


Supplies used:


Built for Free Using: My Stampin Blog


Saturday, July 4, 2015

No stamping today

Happy 4th of July to everyone. Since I've shared my card with you a couple of days ago, I figured I'd share a non stamping related item today. Most of you might not even spend time on the computer and that is GOOD. Go out, have fun and spend time with friends and/or family...

Which brings me to my project. When we go out on the boat and have fun, we bring out "floaties" and since we all have the same ones, I made us some "tags" so we can take home our own...


Front view:


Back view:


Nothing fancy... just a little vinyl cut with the Cameo. But it still had to have some style LOL...

Here is what our group of floats look like when we get them ready


And all hooked together, waiting for their passengers 


Sunday, April 26, 2015

Brayered Background and By the Seashore plus e-cutter

I know, I KNOW! That title is lengthy... BUT I wanted to pack some hints in there as to what's in store for you today!

Here is my card:


It's been a long time that I've done some brayered backgrounds, and I have to tell you, I have so enjoyed doing this one that I will do some more soon. I still LOVE doing these! I brayered the the bottom in Crumb Cake first, and then the top in Lost Lagoon and did not let them overlap to create the lighter center...  The images and greeting were stamped in black memento ink and edges sponged...

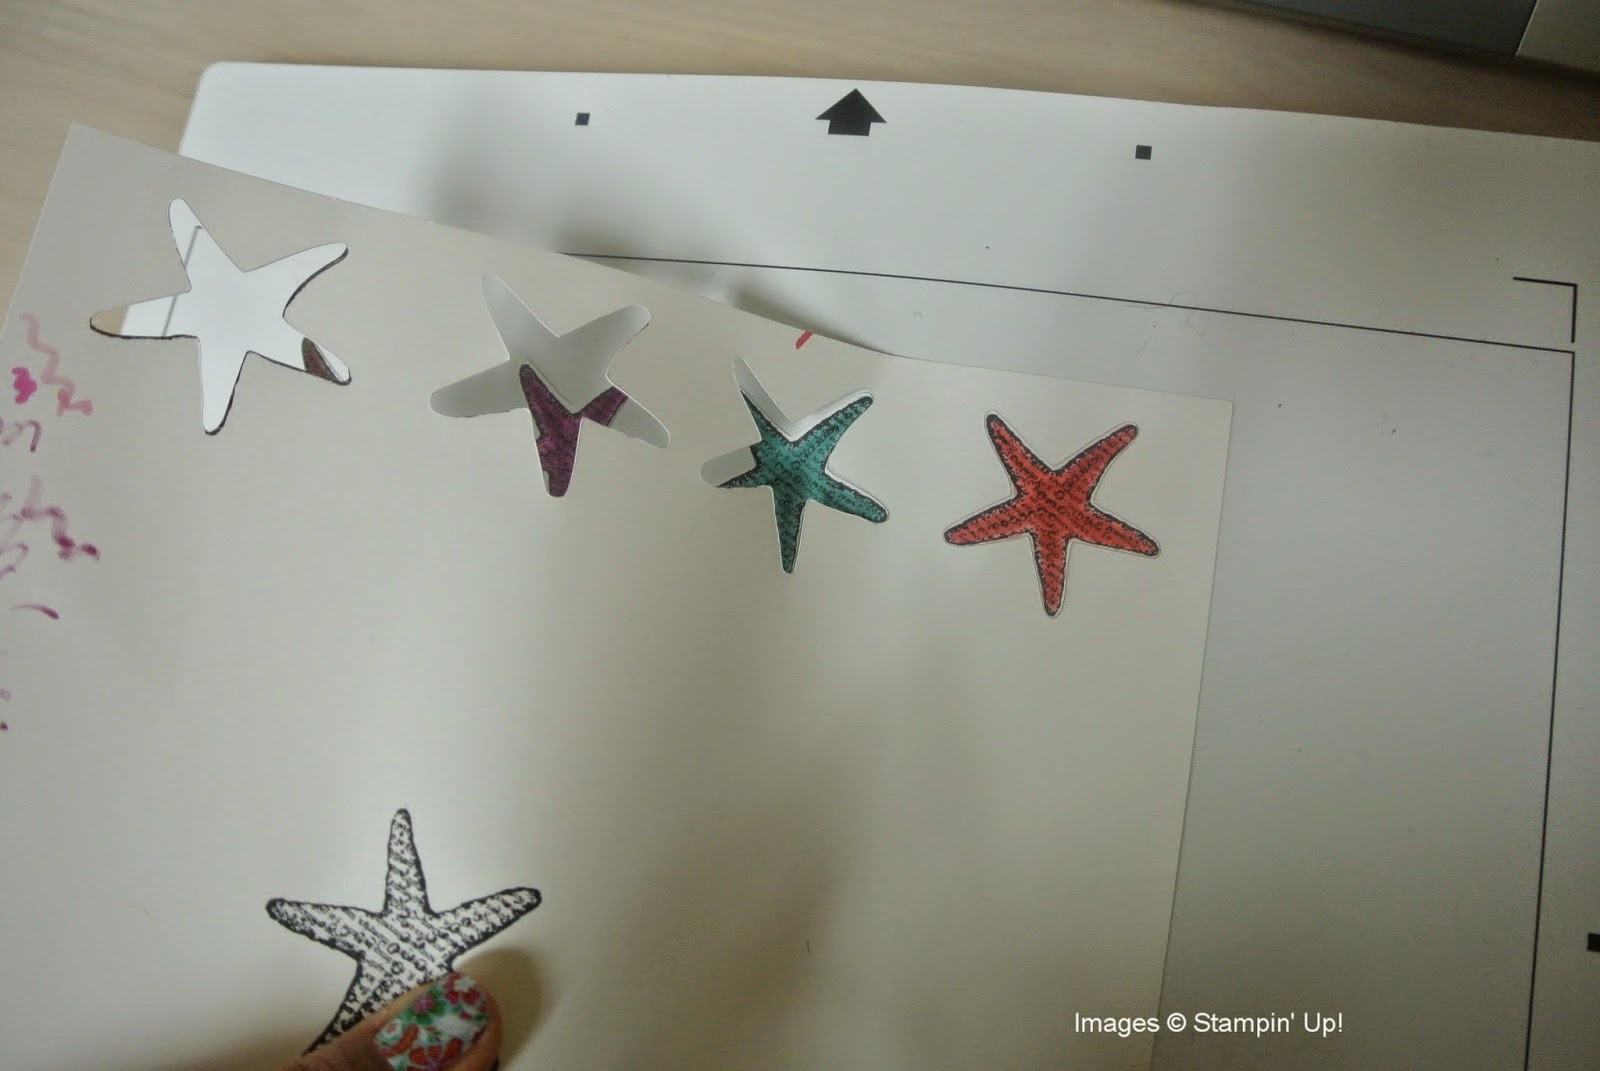
The starfish were stamped on whisper white CS in black memento ink and colored in with my blendabilities (if you don't have any, you'd stamp in black StazOn and color in with Blender Pens or Aqua Painters... I would suggest using shimmery white, Naturals White or Watercolor Paper with those!)

THEN the real exciting part (for me anyways), I used my Silhouette Cameo (electronic cutter) and the PixScan Mat/feature to cut out the starfish automatically and not by hand! Whoot, Whoot! I know this part is not SU related but can so assist you with your SU crafting!

Here are some pics to show the process of the cutting part:


This was so much fun that I may just have to do this more often. Well, scratch that.....WILL do more often :-)

Try to combine your 2 crafting passions too!!!  Have fun! Oh and here is a video where you can learn how to calibrate the mat and use the cut feature!


Supplies used (printable list on bottom left):


Built for Free Using: My Stampin Blog